An entrance, an exit, and a curve you draw yourself.
Pick how a clip comes in and how it goes out, then bend the easing by hand until it feels right. The panel writes real keyframes onto an adjustment layer above the clip, with motion blur, so every value stays yours to edit.
Free to download. Tested on Premiere Pro 2026; 2025 and 2024 work too. The basics stay free forever, Pro unlocks every tool, cancel any time.
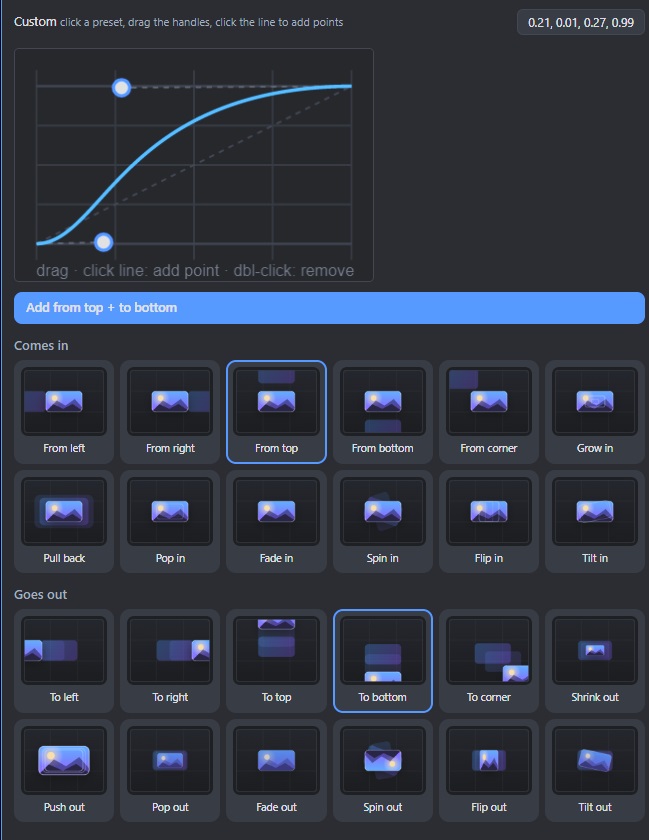
Twenty-four moves and a graph.
Twelve ways in
From left, right, top, bottom or a corner. Grow in, Pull back, Pop in, Fade in, Spin in, Flip in and Tilt in. Every card shows the move as a still and plays it when you hover.
Twelve ways out
The same moves going the other way: To left, To right, To top, To bottom, To corner, Shrink out, Push out, Pop out, Fade out, Spin out, Flip out, Tilt out.
Mix them freely
Choose an entrance and an exit separately and apply both at once. The clip sits still in between, with no keyframes wasted on the hold.
A curve you can draw
Start from a preset, then shape it: drag the handles, click the line to add a point, double-click a point to remove it. The numbers update as you go.
Motion blur included
The keyframes land on a Transform effect with a shutter angle you set anywhere from 0 to 360. Fast moves smear the way they should.
Ease what you already made
The Curve tab works on the keyframes already on your clip. Tick Position, Scale, Rotation, Opacity or any effect property, pick a curve, apply.
Three steps. Nothing to learn.
Free, with no export limit.
Select a clip on the timeline. The panel reads it while you work, so you can switch clips without pressing refresh.
Pick a way in and a way out, set how long they take and how far the clip travels. Or open the Curve tab and draw the easing yourself.
Click Apply. An adjustment layer appears above the clip with the keyframes on it. Revert takes it away again and puts your clip back the way it was.
Frequently asked
Is Motion Curves free?
Yes. It is part of the free panel, with no export limit.
Does the person I send the project to need the panel?
No. These are ordinary keyframes on Premiere’s own Transform effect. Open the project anywhere and it plays the same.
Can I edit the animation afterwards?
Yes. Open Effect Controls on the adjustment layer and move the keyframes like any others.
Why does it write so many keyframes?
Premiere gives extensions no way to set Bezier handles, so the curve is baked in as one keyframe per frame. That is why the movement matches the graph exactly instead of roughly.
Can it stay on the clip instead of an adjustment layer?
Yes. The adjustment layer is the default because it keeps your clip untouched and gives you the shutter angle, but you can switch to the clip itself.